|
How Record
Retention Works in ULTRA |
|||||
|
What is Record Retention? For legal and regulatory reasons, many companies must
keep boxes of records from past years
for a long time, e.g., mortgages/loans applications, deposit agreements,
invoices, etc. The time period can vary but the normal statute of limitations
is around seven years. The volume
of records retained can number in the thousands of boxes, so automation of
this function is critical.
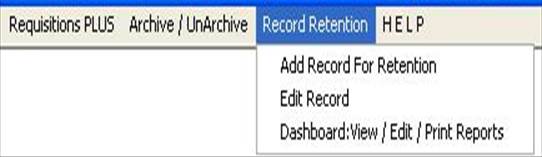
ULTRA’s Record
Retention functions (left) are found in: Main Menu
| Record Retention. Use these three menu
items to manage your record retention as easily as you do supplies. Use the
above Dashboard function to sort,
view, edit, and print retained records on any field. You can also print out
from the Dashboard sorted reports for Active,
To-Be-Destroyed, and Checked Out records. Functions of ULTRA’s Record Retention
|
|||||
|
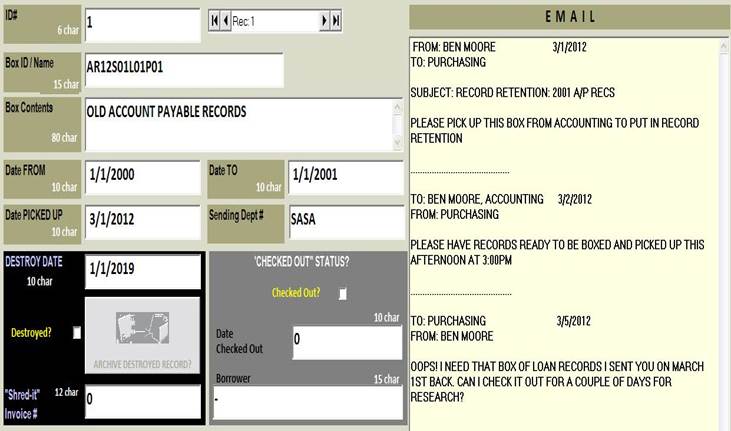
What a “Retained Record” Looks Like What we call a “retained record” is usually a box of
prior years’ documents. These boxes stored in a shelf in a warehouse. ULTRA assigns to each “retained record”:
|
|
||||
|
Email Textbox: Multiple
emails between you and the departments sending the box to storage can be
cut-and-pasted here to summarize activity over a box’s lifetime. The email text
box can hold up to 64K of data and you can update it simply by copying new
text to the last line of the textbox. |
|
||||
|
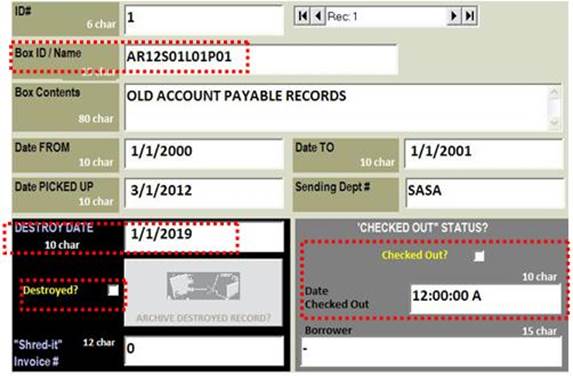
Box ID/Name:
Usually composed of box locator field to help find the box in the warehouse. For example,
AR12S01L0P01 means “Warehouse A, Rack 12, Shelf 01, Level 01, Position 01.” Special Date Fields: Date FROM/TO,
Date PICKED UP, Destroy Date, “Checked Out” Date (left) allow the manager to control the flow
and lifecycle of the retained records “Destroyed” Checkbox: Once a record has been destroyed, the manager marks
it by checking the “Destroyed” check box and then archiving the record. Archiving keeps the record on file although
it is given a new Box ID (its old ID with an “X” prefix) “Checked Out “ Checkbox: If a department borrows a box of retained records from storage, you click the “Checked Out?” box and enter the date and borrower. |
|
||||
|
A Record Retention
“Walk-Through” In
this part, we will follow the steps a NEW BOX OF RECORDS undergoes in its
life cycle: · the
EMAIL REQUEST to put a box into record retention, · ADDING IT to ULTRA · “CHECKING
OUT” a box for review, · RETURNING
a “checked-out” box, · DESTROY
DATE actions · FINAL
ARCHIVING of a “destroyed” record. |
|
||||
|
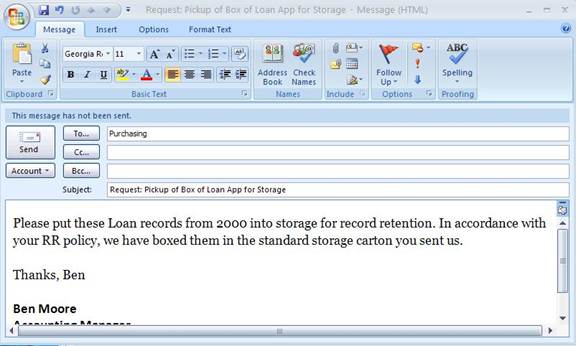
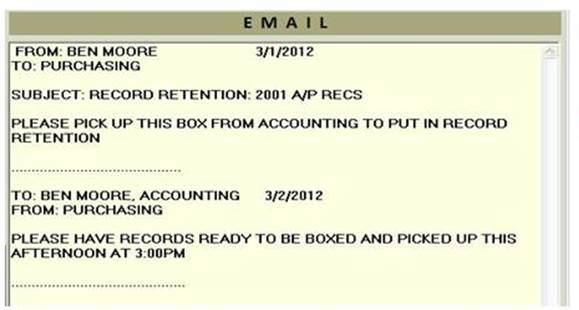
Step 1: Email Request Received What You Do:
|
|
||||
|
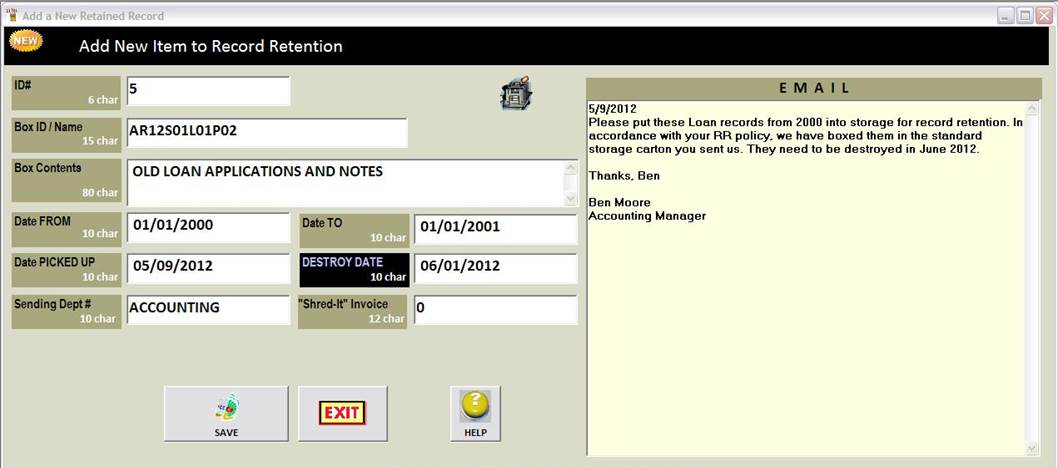
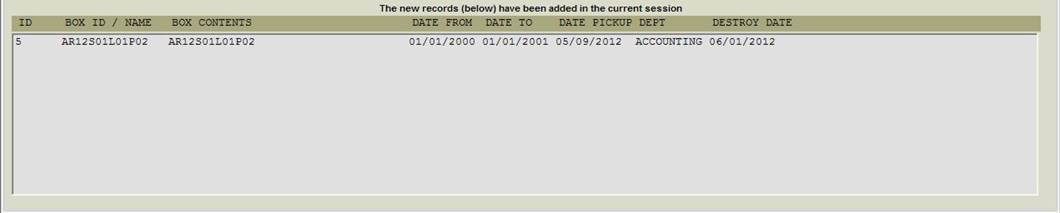
Step 2: Add New Box ID to ULTRA What You Do:
Note: Each field shows the max number of characters
(“chars”) it will accept.
Note: The grey list box ((bottom of “Add”
screen) accumulates each new Box ID
record you add. This helps you keep track of your additions if you are mass-inputting
new records. Alternatively, you may sort your Dashboard by Date Picked Up to
see what records have been added. |
|||||
|
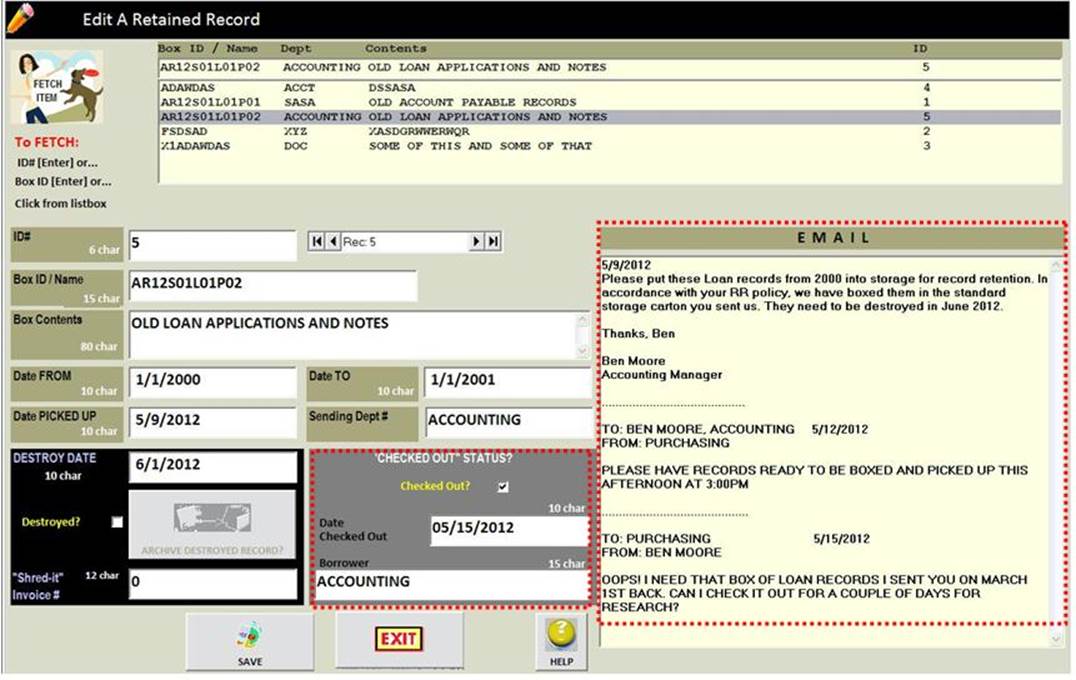
Step 3: Edit a Box When It Is “Checked-Out” Two days later,
the Accounting Department emails you. It seems it needs the box back for
further research. What You Do: 1.
Click Main Menu|Supplies| Edit
Retained Record 2. Copy the
Accounting Dept’s new email (above) and paste
it at the bottom of the ULTRA Email text box. 3. Click the
“Checked Out?” box and enter the date and borrower. 4. Click the “SAVE”
button and then the “EXIT” button
|
|||||
|
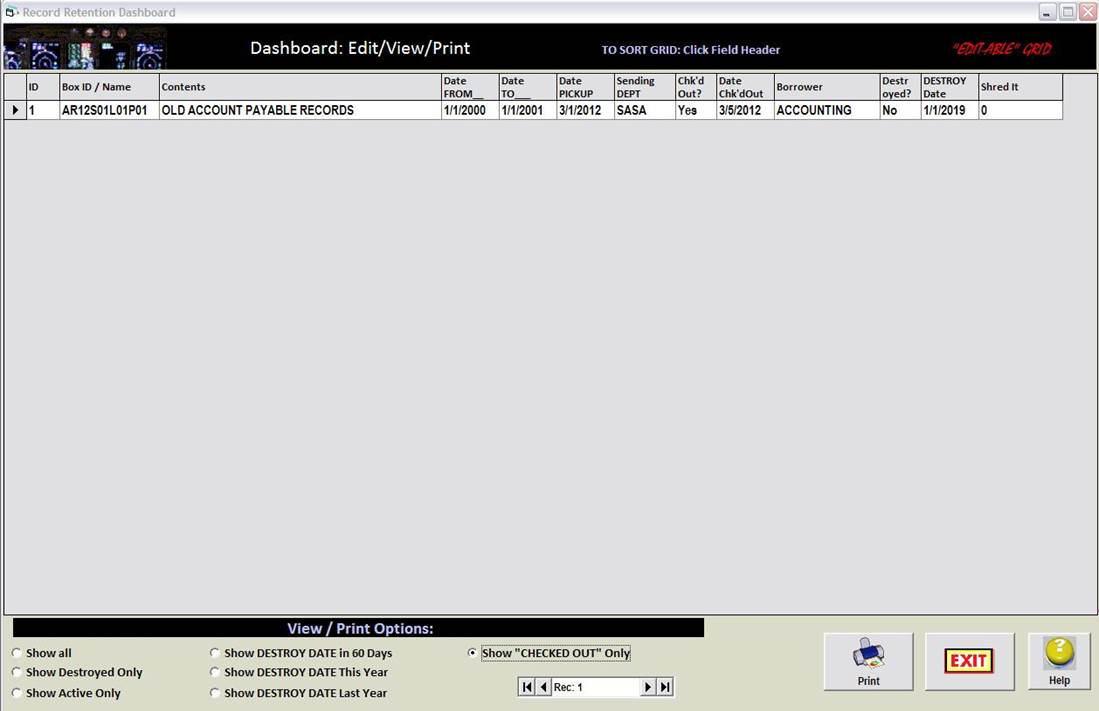
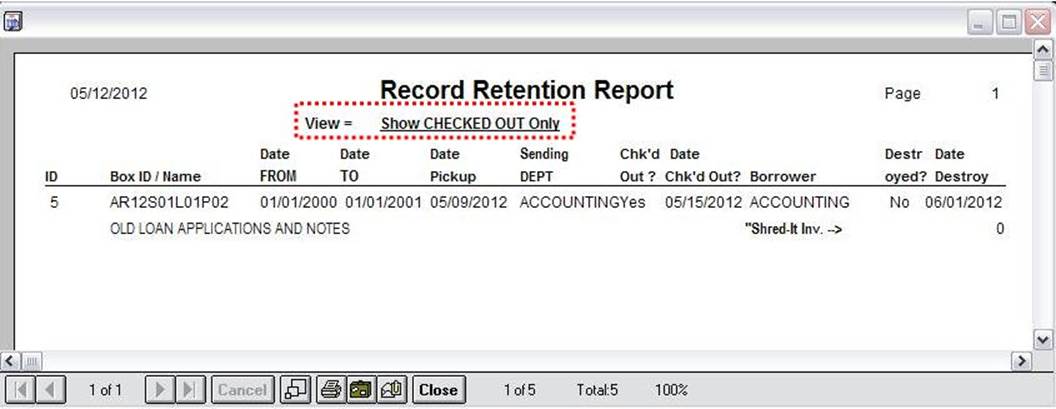
5. Click Main Menu|Supplies| Dashboard: View /
Edit / Print Reports 6. In the “View / Print Options” section, click Show “CHECKED OUT” Only
|
|||||
|
The Dashboard here shows only the checked out records on file.
|
|||||
|
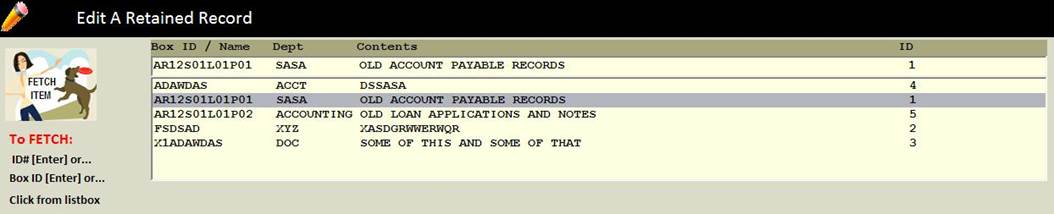
Step 4: Edit a Returned Box Two days later,
the Accounting Department delivers the Box ID AR12S01L01P01 back to Purchasing. What You Do: 1.
Click Main Menu|Supplies| Edit Retained
Record 2. “FETCH” it by
selecting it from the listbox and clicking it
(below)
3. In the grey
“CHECKED OUT STATUS” area, unclick the “Checked Out?” box. 4. The Date Checked Out and Borrower fields are reset. 4. Click the
“SAVE” button and then the “EXIT” button |
|||||
|
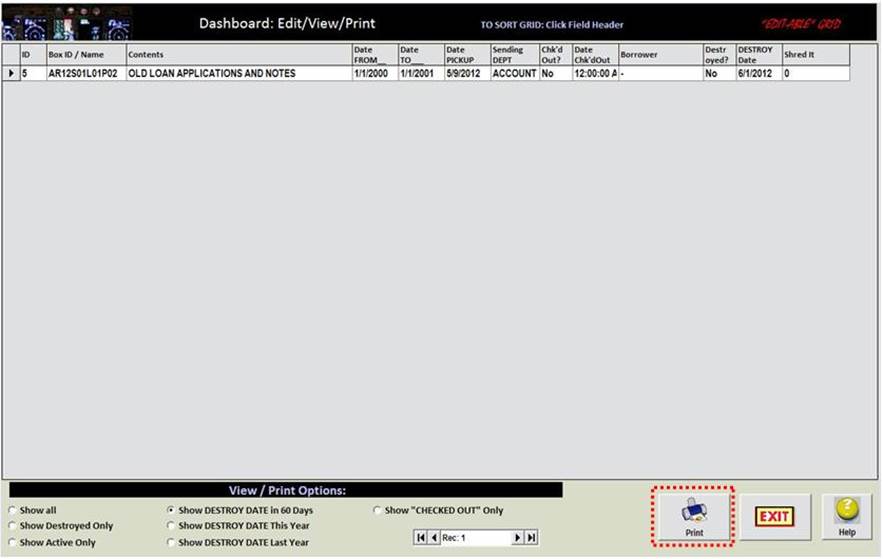
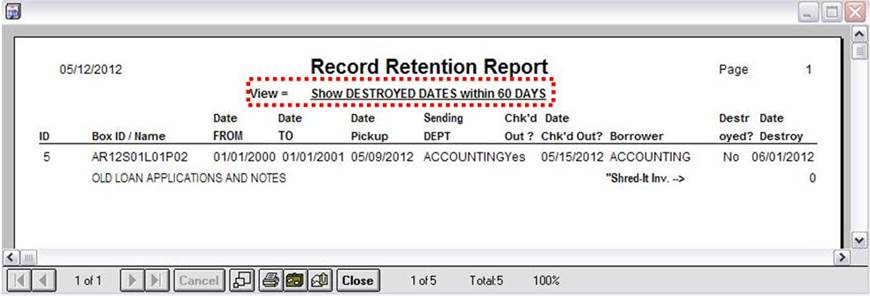
Step 5: DESTROY DATE Actions You can monitor
which records are nearing their DESTROY DATE by using the Dashboard’s View / Print Options function. There are
three time periods you can review
DESTROY DATE items: Within 60 days,
This Year, Last Year.
What You Do: 1.
Click Main Menu|Supplies| Dashboard:
View / Edit / Print Reports 2. In the “View / Print Options” section, click “Show DESTROY DATE in 60 Days.” |
|||||
|
TO PRINT: Click
the “Print” button (below) to
print the report of those records that to be destroyed in 60 days. As
you can see, there is only one such item. Note: You will be able
to preview the report in the Crystal Report window just as you do with all
other ULTRA reports. (see below). |
|
||||
|
|
|||||
|
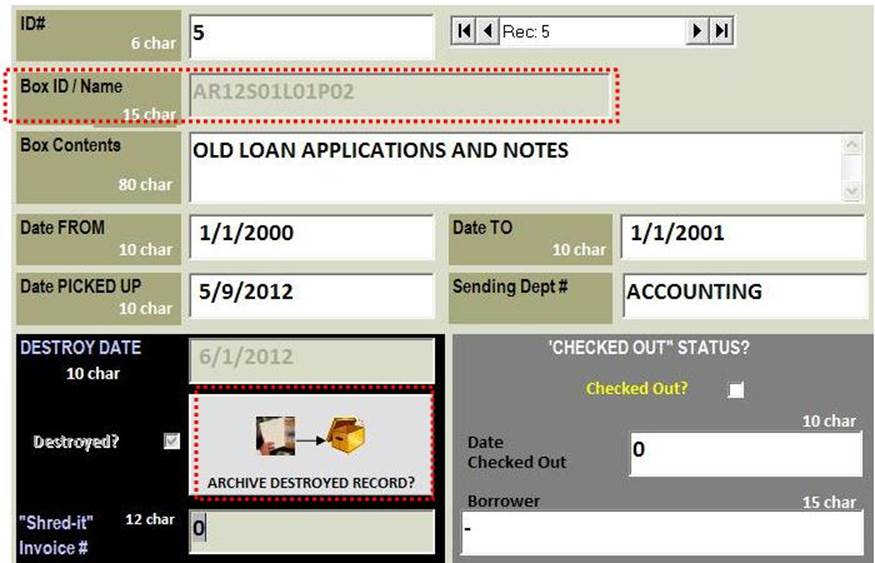
Step 6: Marking the Record “Destroyed” and
Archiving It It is now June
and you consult your “Destroy Date in 60 days” report (right) to learn that
this record is due to be destroyed. You pull the box from
storage and call your “Shred-it” recycling service to schedule a pickup and
recycle it. |
|
||||
|
What You Do: 1.
Click Main Menu|Supplies| Edit
Retained Record 2. “FETCH” it by
selecting it from the listbox. At
this point, the “ARCHIVE DESTROYED RECORD” button is still greyed. It will
not be enabled until you click the “Destroyed?” box. 4. Now click the
“Destroyed?” checkbox. Now
the “ARCHIVE DESTROYED RECORD” button is enabled (right) but the Box ID,
Destroy Date, and “Destroyed?” fields have been greyed. |
|
||||
|
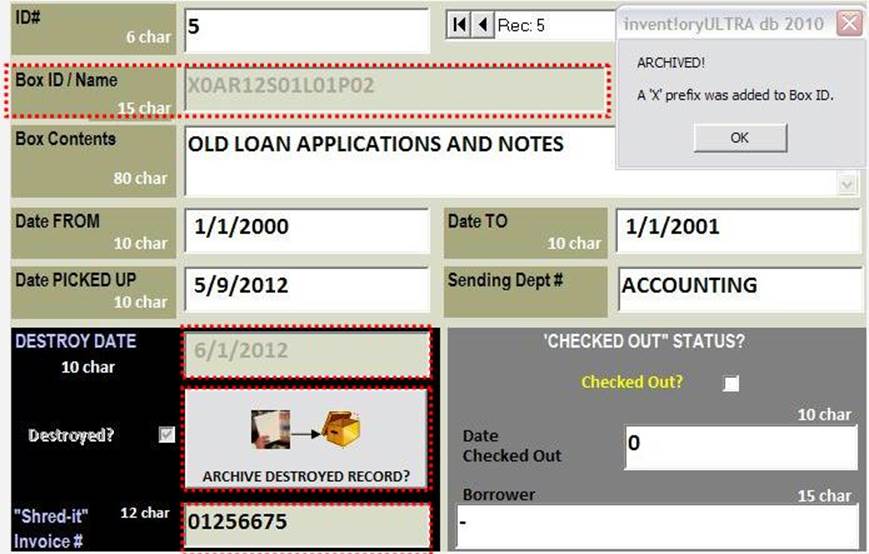
4. Enter the “Shred-it”
invoice # in that field (if you use this recycling service to shred your old
documents). |
|
||||
|
6. Notice that
when you clicked the “ARCHIVE DESTROYED RECORD” button, an “X” prefix was added to the Box ID field. Note:
This “’X’ prefix archiving” protocol lets you reuse the original box ID again
for a new record. Remember, when you destroy a box,
the shelf space location (encoded in the Box ID) is now freed up. The archived record doesn’t go
away; it stays on the database so you can run reports in the Dashboard to
show “All Destroyed” records. This is necessary for auditability down the
road |
|
||||
|
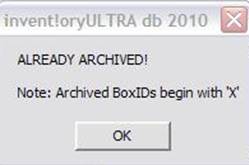
And if you accidentally hit the
ARCHIVE DESTROYED RECORD button again, don’t worry—you will get this message. ULTRA won’t let you archive a
record more than once. |
|
||||
|
Summary: As you can see,
ULTRA’s record retention approach is simple and direct, yet contains all the functions
necessary to manage a large record retention function. And since it exists
within the ULTRA software interface that you already know, you don’t have to spend big bucks for a new
software package and schedule costly training to learn it. |
|||||
|
Copyright
2017, Koehler Software, Inc. |
|||||
![MP900443108[1]](KSI_RR_files/image010.jpg)